To start analysis of paired end Illumina sequence targeted amplicon data you need to create several files describing your data input and the raw sequences files which should be de-multiplexed on the Illumina barcodes already and are in a directory and gzipped. This raw directory will not be modified in any way. At most you will need two input info files and a directory of your de-multiplexed reads.
id file - The id file should contain your primer pairs (forward and reverse primers) and the corresponding names for the targets as well as the barcode with thier names.
samples names file - This file should have at least three columns, the first column will correspond to the raw input data files, the second column is a custom name for your samples, and the third and on are the name of the MIDs used for that sample in that input file, replicates can span across different files
raw data files - All of your raw data should be in one directory and all files that end with .fastq.gz will be considered, see below for how names in the samples names file should correspond to your data files.
ID file and samples names file
Your id file should have all the targets you have in your input data as well as all the barcodes even if all barcodes don’t appear in every input file. The samples names file should then have your sample names with the corresponding MID (3+ columns) used for that sample (2nd column) in that input file (1st column). Avoid using “.” or “_” in sample names as this has the potential to mess up down stream analysis. MIDs can be single or dual barcoded, if single barcode the barcode portion of the input data set will just have two columns the, 1) the name of the MID and 2) the barcode sequence. The first MID barcode sequence column is associated with the forward target primer well the the second column is assoicated with the reverse target primer, both should be in the 5`-3` direction.
Id file agreement with sample names file
Sample names file to input data files
The first column in the samples names file should correspond to your input data files as described below. Your input files can be separated by lanes or just one file per mate file depending on how you got your data from the Illumina machine. The names in these columns should match to the corresponding data files up to the first underscore in the raw data file. This is done because of the way the Illumina machine normally outputs data and names the files (histoically they use to not allow underscores, this may have changed in recent versions but SeekDeep has an utiltiy to modified input file names by replacing underscores).
Samples name file agreement with input data
Optional Adding meta data to sample info
If you have meta data you would like to associate with your samples you can give a file adding the info. This info will be given with the final results from the SeekDeep pipeline to make downstream analysis easier by having it already in the tables. SeekDeep will also organize data separated out by meta data to ease viewing of the data by group. See the below diagram as how this meta data should be matched up with the previous files described in this section. The name of the meta data file is given to the --groupMeta argument.
Group Meta Data
Optional Supplying expected length cut offs
By default the extractor will extract sequences and supplying filtering by throwing out any sequences that are more than 20% away from the median length of the input sequences. You can supply a different length cut off specific for each target with an additional file, see below for further details. The name of the length cutoff file is given to the --lenCutOffs argument.
SeekDeep comes equipped with a helper function (SeekDeep genTargetInfoFromGenomes) to provide some of the files used by the program. It is not required that you use this helper function as all of these files can be created by hand but this helper function can help ease the creation of these files. SeekDeep genTargetInfoFromGenomes needs bowtie2 and samtools to be installed and requires a directory of genomes (at least 1). SeekDeep genTargetInfoFromGenomes takes a primer ID file that is required by SeekDeep extractor and extracts the sequences expected with the primers from the genomes. Below I download just the 3D7 reference genome for Plasmodium falciparum but it can be ran on several genomes at once. This simply done by using bowtie2 to find possible locations of the forward and reverse primers (for which degenerative bases are allowed) and then extracts the sequence found in between these hits.
--genomeDir - A directory of genomes that must end in .fasta (the .fasta extension is used to determine which files in this directory to treat as genomes) which will be automatically bowtie2 indexed if they aren’t already
--primers - The ID file containing the primers used
--pairedEndLength - The length of the input sequencing length for paired end analysis (e.g. 250 for 2x250)
Optional options
--gffDir - a directory of gff files to add gene annotation information
--numThreads - The number of threads/CPUs to use in parallel
--dout - A name of an output directory
--lenCutOffSizeExpand - By default the max and min sizes are set to the +/-20 off of the max and min sizes of the extracted seqs, since msp1 here has large length variation, this has been increased to +/- 50 though this could also be solved by using more than just the Pf3D7 genome and using more refs.
--sizeLimit - Since by default this program is used for short amplicon analysis there is an default size limit for the extraction length (1000), meaning possible extractions longer than 1000 bp will not be extracted, which can be changed with this flag.
Output
All of the output will be in one directory. Within this directory there will be a directory for each target given in the ID file that contains several useful files including:
extractionCounts.tab.txt - A file giving how many times each primer hit and the number of extractions per genome
forwardPrimer.fasta - The forward primer used, if it contained degenerative bases this file will be every possible primer
reversePrimer.fasta - The reverse primer used, if it contained degenerative bases this file will be every possible primer
genomeLocations - The genomic locations of the extractions
[TARGET_NAME].fasta - A fasta file of the extractions
**[TARGET_NAME]_primersRemoved.fasta** - A fasta file of the extractions with the primers removed
There will also be a directory named forSeekDeep which will contain three files useful for SeekDeep runs:
lenCutOffs.txt - A file giving estimated length cut off by using the max and min lengths of the extracted reference sequences
overlapStatuses.txt - A file indicating the overlap possible given the paired end sequencing length and the length of the reference sequences, required by SeekDeep extractorPairedEnd, see SeekDeep extractor and Illumina Paired Info Page
refSeqs - A directory of the extracted reference sequences with a fasta file for each target, this directory can be given to SeekDeep extractor to help filter off artifact/contamination
SeekDeep setupTarAmpAnalysis
back to top
To setup the analysis use the SeekDeep setupTarAmpAnalysis command, see the required and optional commands below.
--samples - The file with samples names and raw data file names as explained above
--outDir - An output directory where analysis will be set up
--inputDir - The input raw data directory
--idFile - The id file explained above
--overlapStatusFnp - The file giving how the mates for each target overlap
Optional arguments
--lenCutOffs - A file with optional max and min lengths for the targets in the dataset
--groupMeta - A file with meta data to associate with the input samples, see above to see how this file should be associated with the other input files
--numThreads - The number of CPUs to be utilized to speed up analysis
--refSeqsDir - A directory of reference sequences to be utilized for filtering out artifacts and possible contamination, needs to have a fasta named with the name of the targets in the ID file
Passing on additional arguments to the default arguments of the 3 main sub-commands
Default scripts are created for each of the downstream analysis commands and additional arguments can be passed onto these scripts via the following three commands.
* --extraExtractorCmds - Any extra commands to append to the default ones for the extractor step, should be given in quotes e.g. --extraExtractorCmds="--checkRevComplementForPrimers --qualWindow 50,5,18"
* --extraQlusterCmds - Any extra commands to append to the default ones for the qluster step, should be given in quotes
* --extraProcessClusterCmds - Any extra commands to append to the default ones for the processClusters step, should be given in quotes
overlapStatusFnp File Set up
See SeekDeep extractor and Illumina Paired Info Page for more information on overlap status input and below is a diagram of how this file should be set up and compared to the input id file.
This will extract the raw data from the input directory and it will also stitch together the mate reads, a report of how the stitching went will be in the output directory in a directory called reports. Also id files will also be copied into the directory as well. Also default scripts will be created that will run the rest of the analysis with defaults for Illumina data, all of which can be ran by the file, runAnalysis.sh in the output directory.
./runAnalysis.sh
Code
#!/usr/bin/env bash##run all parts of the pipelinenumThreads=1if[[$#-eq 1 ]];thennumThreads=$1fiSeekDeep runMultipleCommands --cmdFile extractorCmds.txt --numThreads$numThreads--rawSeekDeep runMultipleCommands --cmdFile qlusterCmds.txt --numThreads$numThreads--rawSeekDeep runMultipleCommands --cmdFile processClusterCmds.txt --numThreads$numThreads--rawSeekDeep runMultipleCommands --cmdFile genConfigCmds.txt --numThreads$numThreads--raw
The files extractorCmds.txt, qlusterCmds.txt, processClusterCmds.txt, and genConfigCmds.txt contain command line commands on each line to run the analysis. The SeekDeep runMultipleCommands is command in SeekDeep that can take in such a file and run them in parallel speeding up analysis.
See below to see how these command files match up to the pipeline.
SeekDeep Pipeline
And then to start the server to see the data interactively run the file startServerCmd.sh after running the above command files. ./startServerCmd.sh
Code
#!/usr/bin/env bash# Will automatically run the server in the background and with nohup so it will keep runningif[[$#-ne 2 ]]&&[[$#-ne 0 ]];thenecho"Illegal number of parameters, needs either 0 or 2 argument, if 2 args 1) port number to server on 2) the name to serve on"echo"Examples"echo"./startServerCmd.sh"echo"./startServerCmd.sh 9882 pcv2"exitfiif[[$#-eq 2 ]];thennohup SeekDeep popClusteringViewer --verbose--configDir$(pwd)/serverConfigs --port$1--name$2&elsenohup SeekDeep popClusteringViewer --verbose--configDir$(pwd)/serverConfigs &fi
Running Tutorial example data
The tutorial data was simulated using data from Pf3k to emulate sampling from Ghana, Democratic Republic of the Congo, Thaliand, and Cambodia from 2011 and 2013 with sequencing of 3 different targets regions in AMA1, CSP, and K13 with each patient being sequenced at 3 different time points after recieving treatment. Example datasets are available to demonstrate the several different ways libraries could be set up.
Depending on your library prep for Illumina your sequences could be in two different directions or one direction; this depends on if the forward Illumina forward primer/adaptor is always attached to your target primer forward primer or if it could be attached to either primer, see Illumina Paired End Set up for more details. If your sequences are in both direction you need to add --checkRevComplementForPrimers to the extractor commands which can be done in set up by adding it to --extraExtractorCmds. Examples datasets have also been created for experiments with no replicates, replicates and a mix of some samples with replicates and some samples without replicates.
In both directions
Code
# no replicates## single barcodeswget http://seekdeep.brown.edu/data/SeekDeepTutorialData/ver2_6_0/CamThaiGhanaDRC_2011_2013_drugRes_withRevComp_withBars.tar.gz## dual barcodeswget http://seekdeep.brown.edu/data/SeekDeepTutorialData/ver2_6_0/CamThaiGhanaDRC_2011_2013_drugRes_withRevComp_withDualBars.tar.gz# some samples with replicates, some without## single barcodeswget http://seekdeep.brown.edu/data/SeekDeepTutorialData/ver2_6_0/CamThaiGhanaDRC_2011_2013_drugRes_withRevComp_withBars_withMixReps.tar.gz## dual barcodeswget http://seekdeep.brown.edu/data/SeekDeepTutorialData/ver2_6_0/CamThaiGhanaDRC_2011_2013_drugRes_withRevComp_withDualBars_withMixReps.tar.gz# all samples with replicates## single barcodeswget http://seekdeep.brown.edu/data/SeekDeepTutorialData/ver2_6_0/CamThaiGhanaDRC_2011_2013_drugRes_withRevComp_withBars_withReps.tar.gz## dual barcodeswget http://seekdeep.brown.edu/data/SeekDeepTutorialData/ver2_6_0/CamThaiGhanaDRC_2011_2013_drugRes_withRevComp_withDualBars_withReps.tar.gz
For each of these datasets the setup commands will be the same, only the input sample names file will be different
Code
wget http://seekdeep.brown.edu/data/SeekDeepTutorialData/ver2_6_0/CamThaiGhanaDRC_2011_2013_drugRes_withRevComp_withBars.tar.gztar-zxvf CamThaiGhanaDRC_2011_2013_drugRes_withRevComp_withBars.tar.gzcd CamThaiGhanaDRC_2011_2013_drugRes_withRevComp_withBars# download genomes if they haven't been beforewget http://seekdeep.brown.edu/data/plasmodiumData/selected_pf3k_genomes.tar.gz tar-zxvf selected_pf3k_genomes.tar.gzSeekDeep genTargetInfoFromGenomes --gffDir selected_pf3k_genomes/info/gff --genomeDir selected_pf3k_genomes/genomes/ --primers ids.tab.txt --numThreads 4 --pairedEndLength 250 --dout extractedRefSeqs# set up command SeekDeep setupTarAmpAnalysis --samples sampleNames.tab.txt --outDir analysis --inputDir fastq/ --idFile ids.tab.txt --overlapStatusFnp extractedRefSeqs/forSeekDeep/overlapStatuses.txt --lenCutOffs extractedRefSeqs/forSeekDeep/lenCutOffs.txt --refSeqsDir extractedRefSeqs/forSeekDeep/refSeqs --extraExtractorCmds="--checkRevComplementForMids --checkShortenBars"--groupMeta metaData.tab.txtcd analysis# run analysis with whatever number of CPUs you want to use (below is 4)./runAnalysis.sh 4# start data viewer./startServerCmd.sh
Also length cut off and overlap status files can be located in the tutorial directory if you don’t want to or can’t download the genomes
# no replicates## single barcodeswget http://seekdeep.brown.edu/data/SeekDeepTutorialData/ver2_6_0/CamThaiGhanaDRC_2011_2013_drugRes_withBars.tar.gz## dual barcodeswget http://seekdeep.brown.edu/data/SeekDeepTutorialData/ver2_6_0/CamThaiGhanaDRC_2011_2013_drugRes_withDualBars.tar.gz# some samples with replicates, some without## single barcodeswget http://seekdeep.brown.edu/data/SeekDeepTutorialData/ver2_6_0/CamThaiGhanaDRC_2011_2013_drugRes_withBars_withMixReps.tar.gz## dual barcodeswget http://seekdeep.brown.edu/data/SeekDeepTutorialData/ver2_6_0/CamThaiGhanaDRC_2011_2013_drugRes_withDualBars_withMixReps.tar.gz# all samples with replicates## single barcodeswget http://seekdeep.brown.edu/data/SeekDeepTutorialData/ver2_6_0/CamThaiGhanaDRC_2011_2013_drugRes_withBars_withReps.tar.gz## dual barcodeswget http://seekdeep.brown.edu/data/SeekDeepTutorialData/ver2_6_0/CamThaiGhanaDRC_2011_2013_drugRes_withDualBars_withReps.tar.gz
For each of these datasets the setup commands will be the same, only the input sample names file will be different
Code
wget http://seekdeep.brown.edu/data/SeekDeepTutorialData/ver2_6_0/CamThaiGhanaDRC_2011_2013_drugRes_withBars.tar.gztar-zxvf CamThaiGhanaDRC_2011_2013_drugRes_withBars.tar.gzcd CamThaiGhanaDRC_2011_2013_drugRes_withBars# download genomes if they haven't been beforewget http://seekdeep.brown.edu/data/plasmodiumData/selected_pf3k_genomes.tar.gz tar-zxvf selected_pf3k_genomes.tar.gzSeekDeep genTargetInfoFromGenomes --gffDir selected_pf3k_genomes/info/gff --genomeDir selected_pf3k_genomes/genomes/ --primers ids.tab.txt --numThreads 4 --pairedEndLength 250 --dout extractedRefSeqs# set up command SeekDeep setupTarAmpAnalysis --samples sampleNames.tab.txt --outDir analysis --inputDir fastq/ --idFile ids.tab.txt --overlapStatusFnp extractedRefSeqs/forSeekDeep/overlapStatuses.txt --lenCutOffs extractedRefSeqs/forSeekDeep/lenCutOffs.txt --refSeqsDir extractedRefSeqs/forSeekDeep/refSeqs --extraExtractorCmds="--checkShortenBars"--groupMeta metaData.tab.txtcd analysis# run analysis with whatever number of CPUs you want to use (below is 4)./runAnalysis.sh 4# start data viewer./startServerCmd.sh
Also length cut off and overlap status files can be located in the tutorial directory if you don’t want to or can’t download the genomes
Check out http://seekdeep.brown.edu/SeekDeepExample to see an example of the server hosting of the replicate tutorial data.
Source Code
To start analysis of paired end Illumina sequence targeted amplicon data you need to create several files describing your data input and the raw sequences files which should be de-multiplexed on the Illumina barcodes already and are in a directory and gzipped. This raw directory will not be modified in any way. At most you will need two input info files and a directory of your de-multiplexed reads. * **id file** - The id file should contain your primer pairs (forward and reverse primers) and the corresponding names for the targets as well as the barcode with thier names. * **samples names file** - This file should have at least three columns, the first column will correspond to the raw input data files, the second column is a custom name for your samples, and the third and on are the name of the MIDs used for that sample in that input file, replicates can span across different files * **raw data files** - All of your raw data should be in one directory and all files that end with .fastq.gz will be considered, see below for how names in the samples names file should correspond to your data files. # ID file and samples names file Your id file should have all the targets you have in your input data as well as all the barcodes even if all barcodes don't appear in every input file. The samples names file should then have your sample names with the corresponding MID (3+ columns) used for that sample (2nd column) in that input file (1st column). Avoid using "." or "_" in sample names as this has the potential to mess up down stream analysis. MIDs can be single or dual barcoded, if single barcode the barcode portion of the input data set will just have two columns the, 1) the name of the MID and 2) the barcode sequence. The first MID barcode sequence column is associated with the forward target primer well the the second column is assoicated with the reverse target primer, both should be in the 5\`-3\` direction. 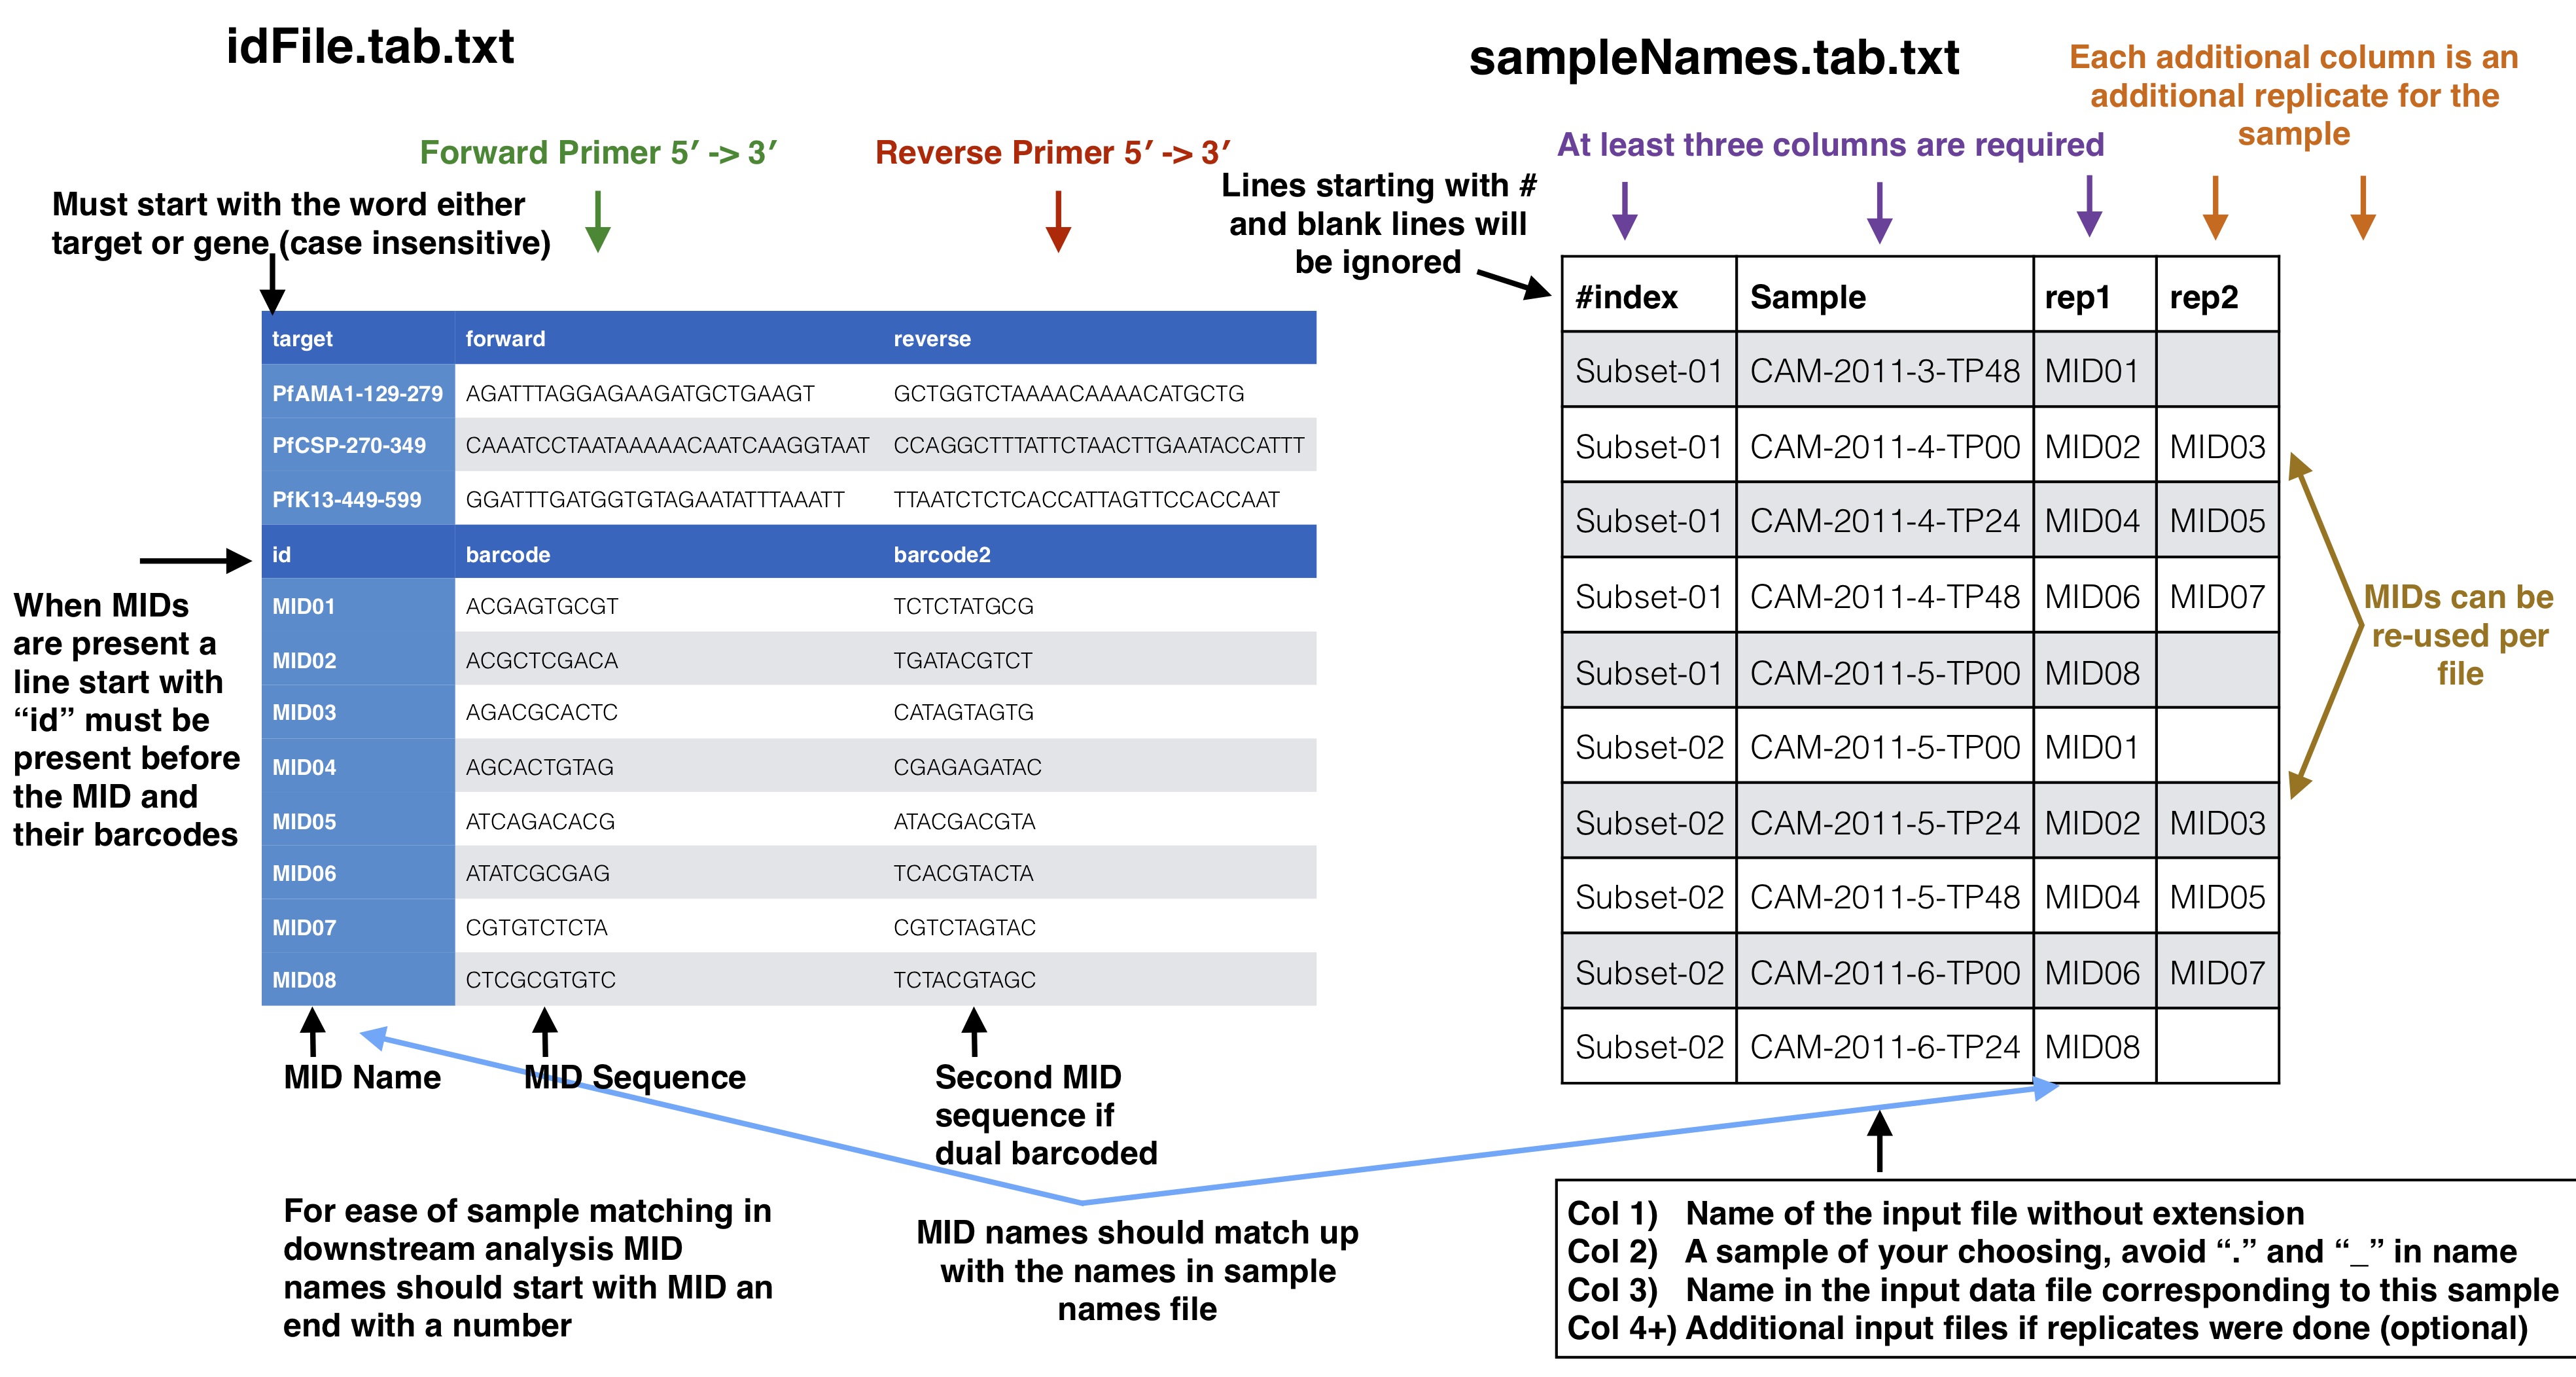# Sample names file to input data files The first column in the samples names file should correspond to your input data files as described below. Your input files can be separated by lanes or just one file per mate file depending on how you got your data from the Illumina machine. The names in these columns should match to the corresponding data files up to the first underscore in the raw data file. This is done because of the way the Illumina machine normally outputs data and names the files (histoically they use to not allow underscores, this may have changed in recent versions but `SeekDeep` has an utiltiy to modified input file names by replacing underscores). 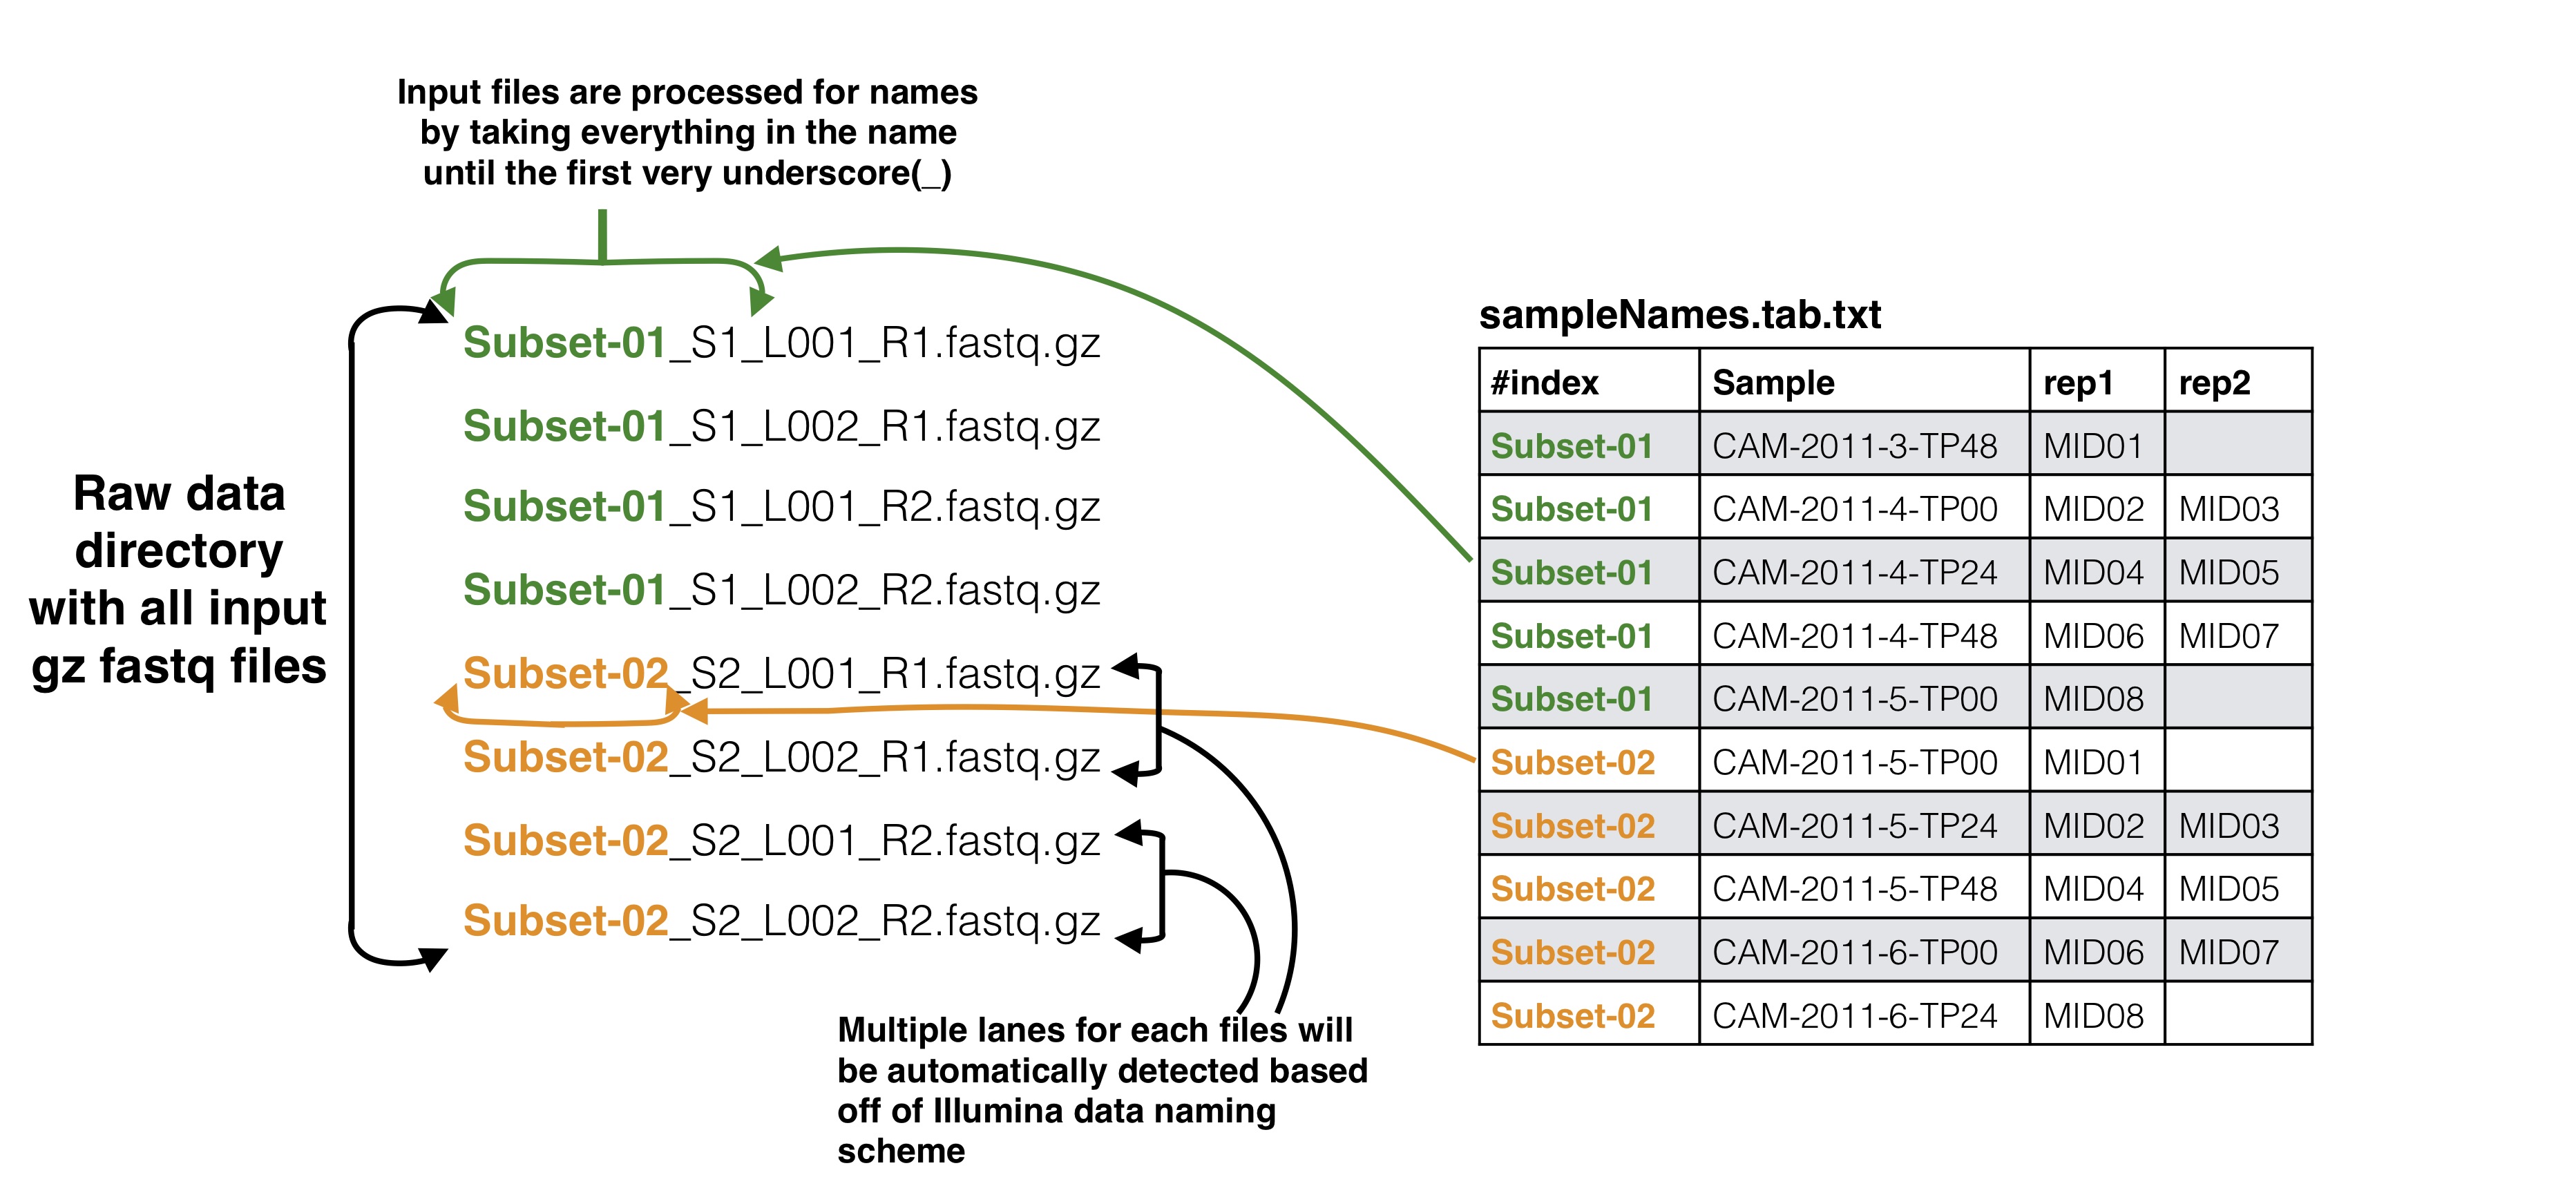## Optional Adding meta data to sample info If you have meta data you would like to associate with your samples you can give a file adding the info. This info will be given with the final results from the SeekDeep pipeline to make downstream analysis easier by having it already in the tables. `SeekDeep` will also organize data separated out by meta data to ease viewing of the data by group. See the below diagram as how this meta data should be matched up with the previous files described in this section. The name of the meta data file is given to the `--groupMeta` argument. 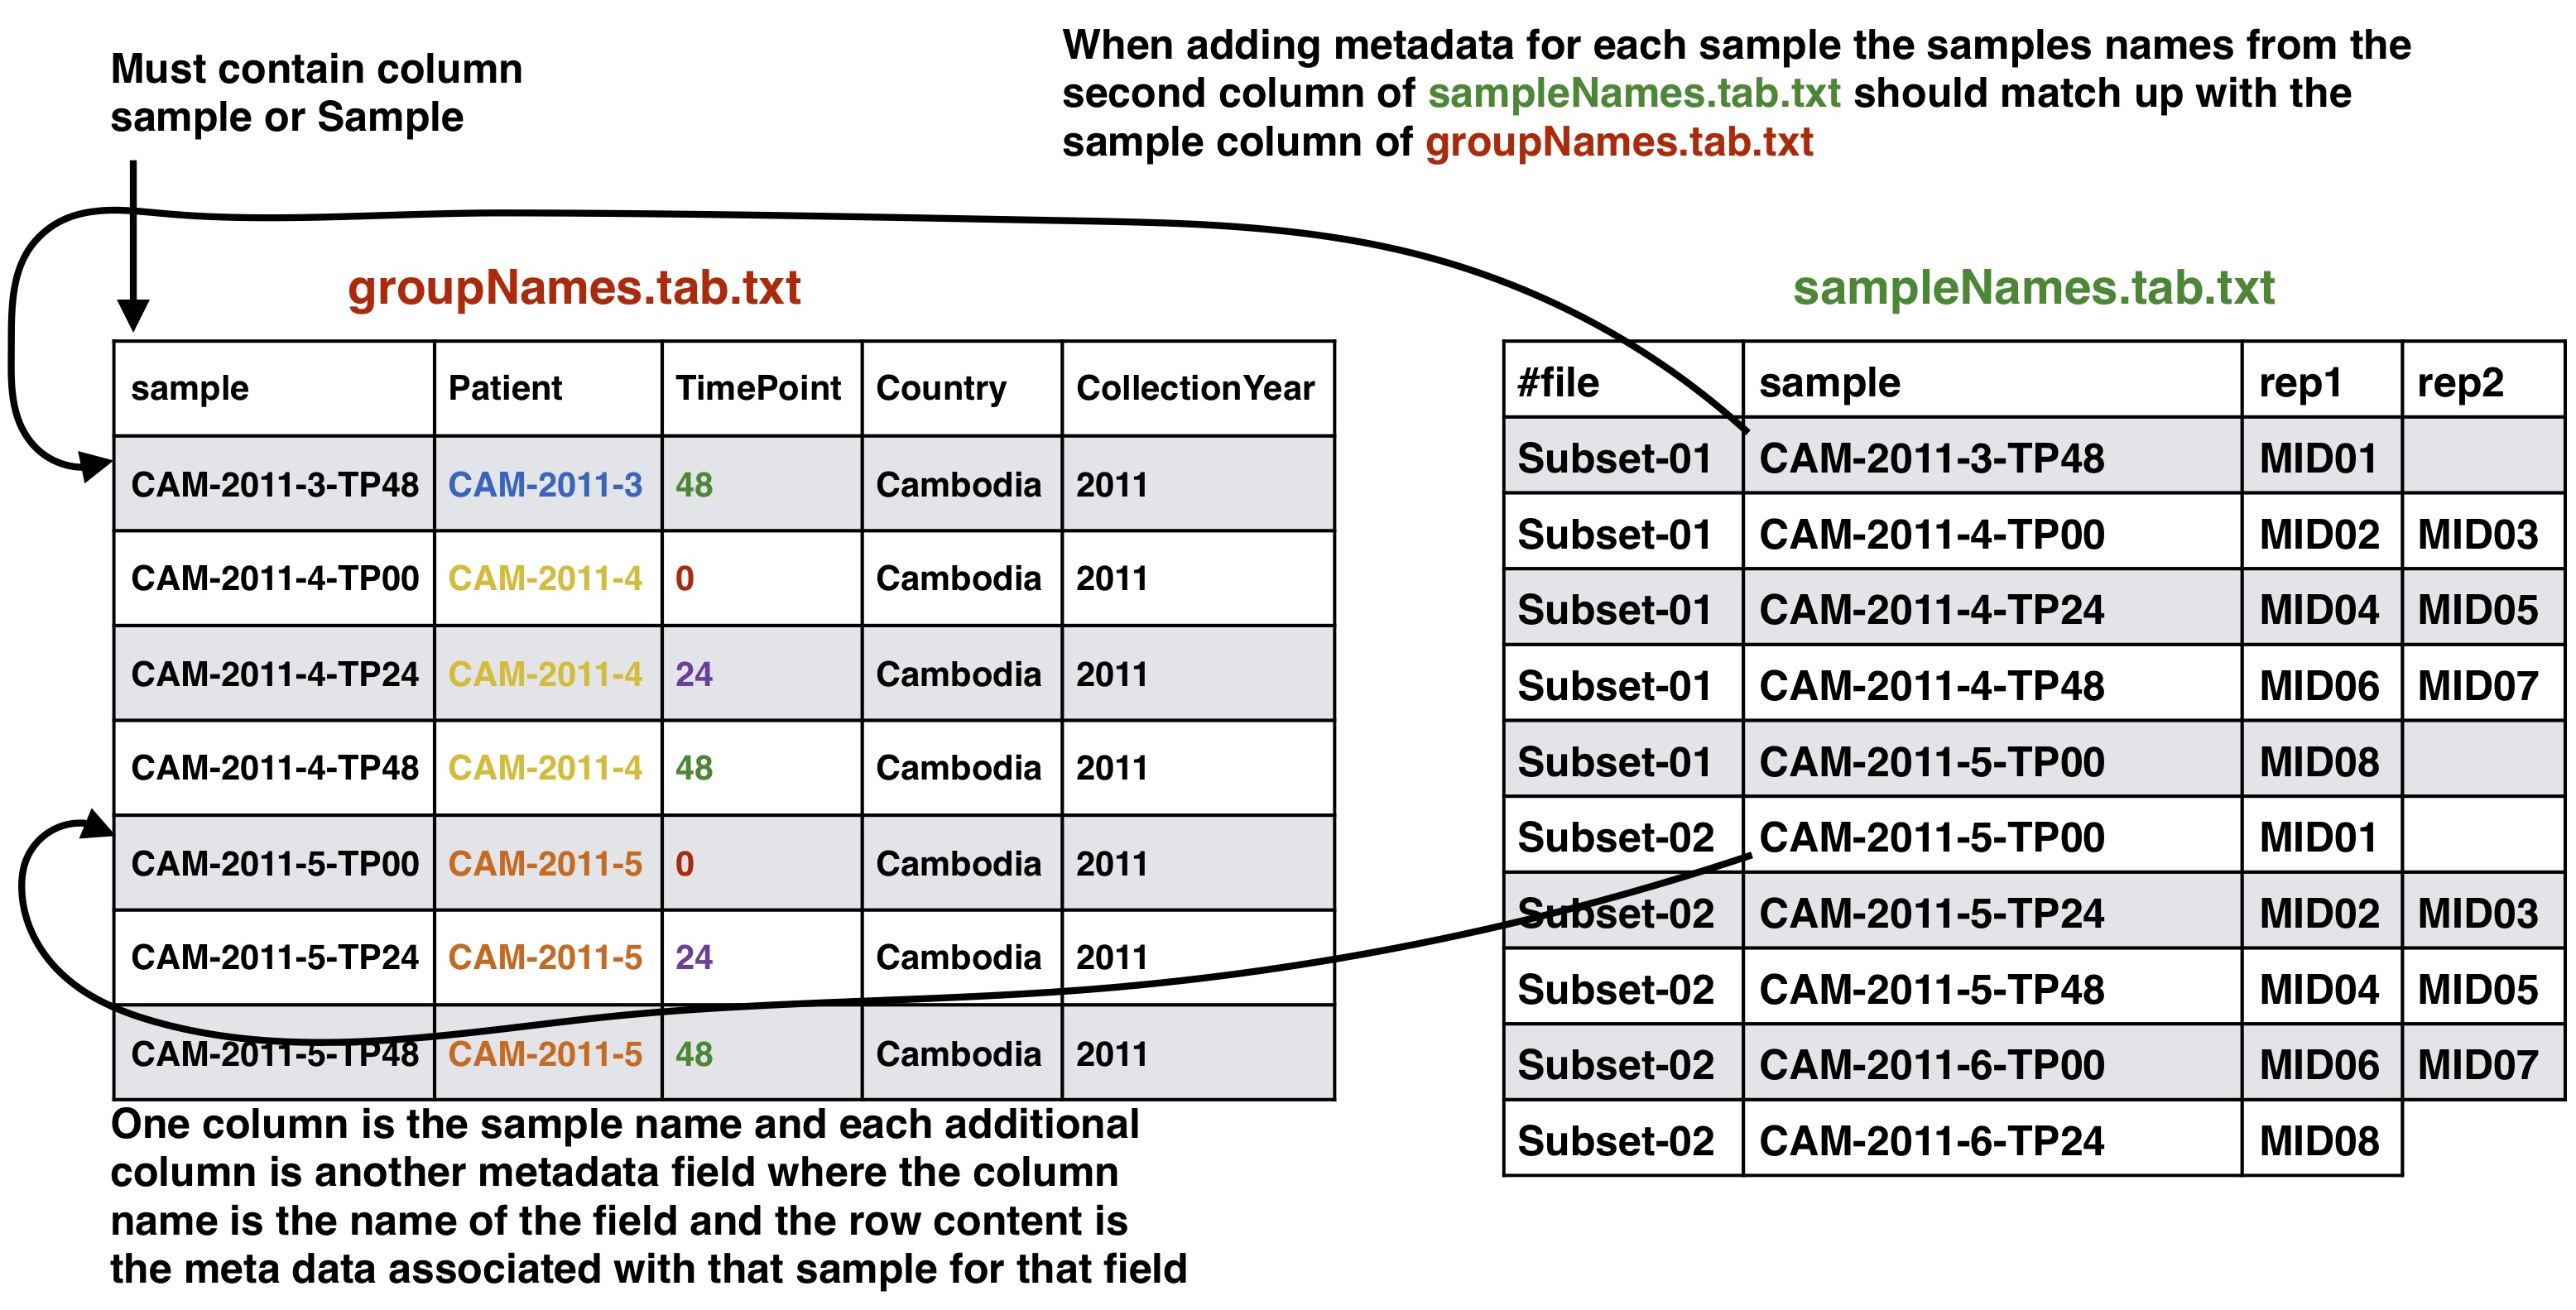## Optional Supplying expected length cut offs By default the extractor will extract sequences and supplying filtering by throwing out any sequences that are more than 20% away from the median length of the input sequences. You can supply a different length cut off specific for each target with an additional file, see below for further details. The name of the length cutoff file is given to the `--lenCutOffs` argument. 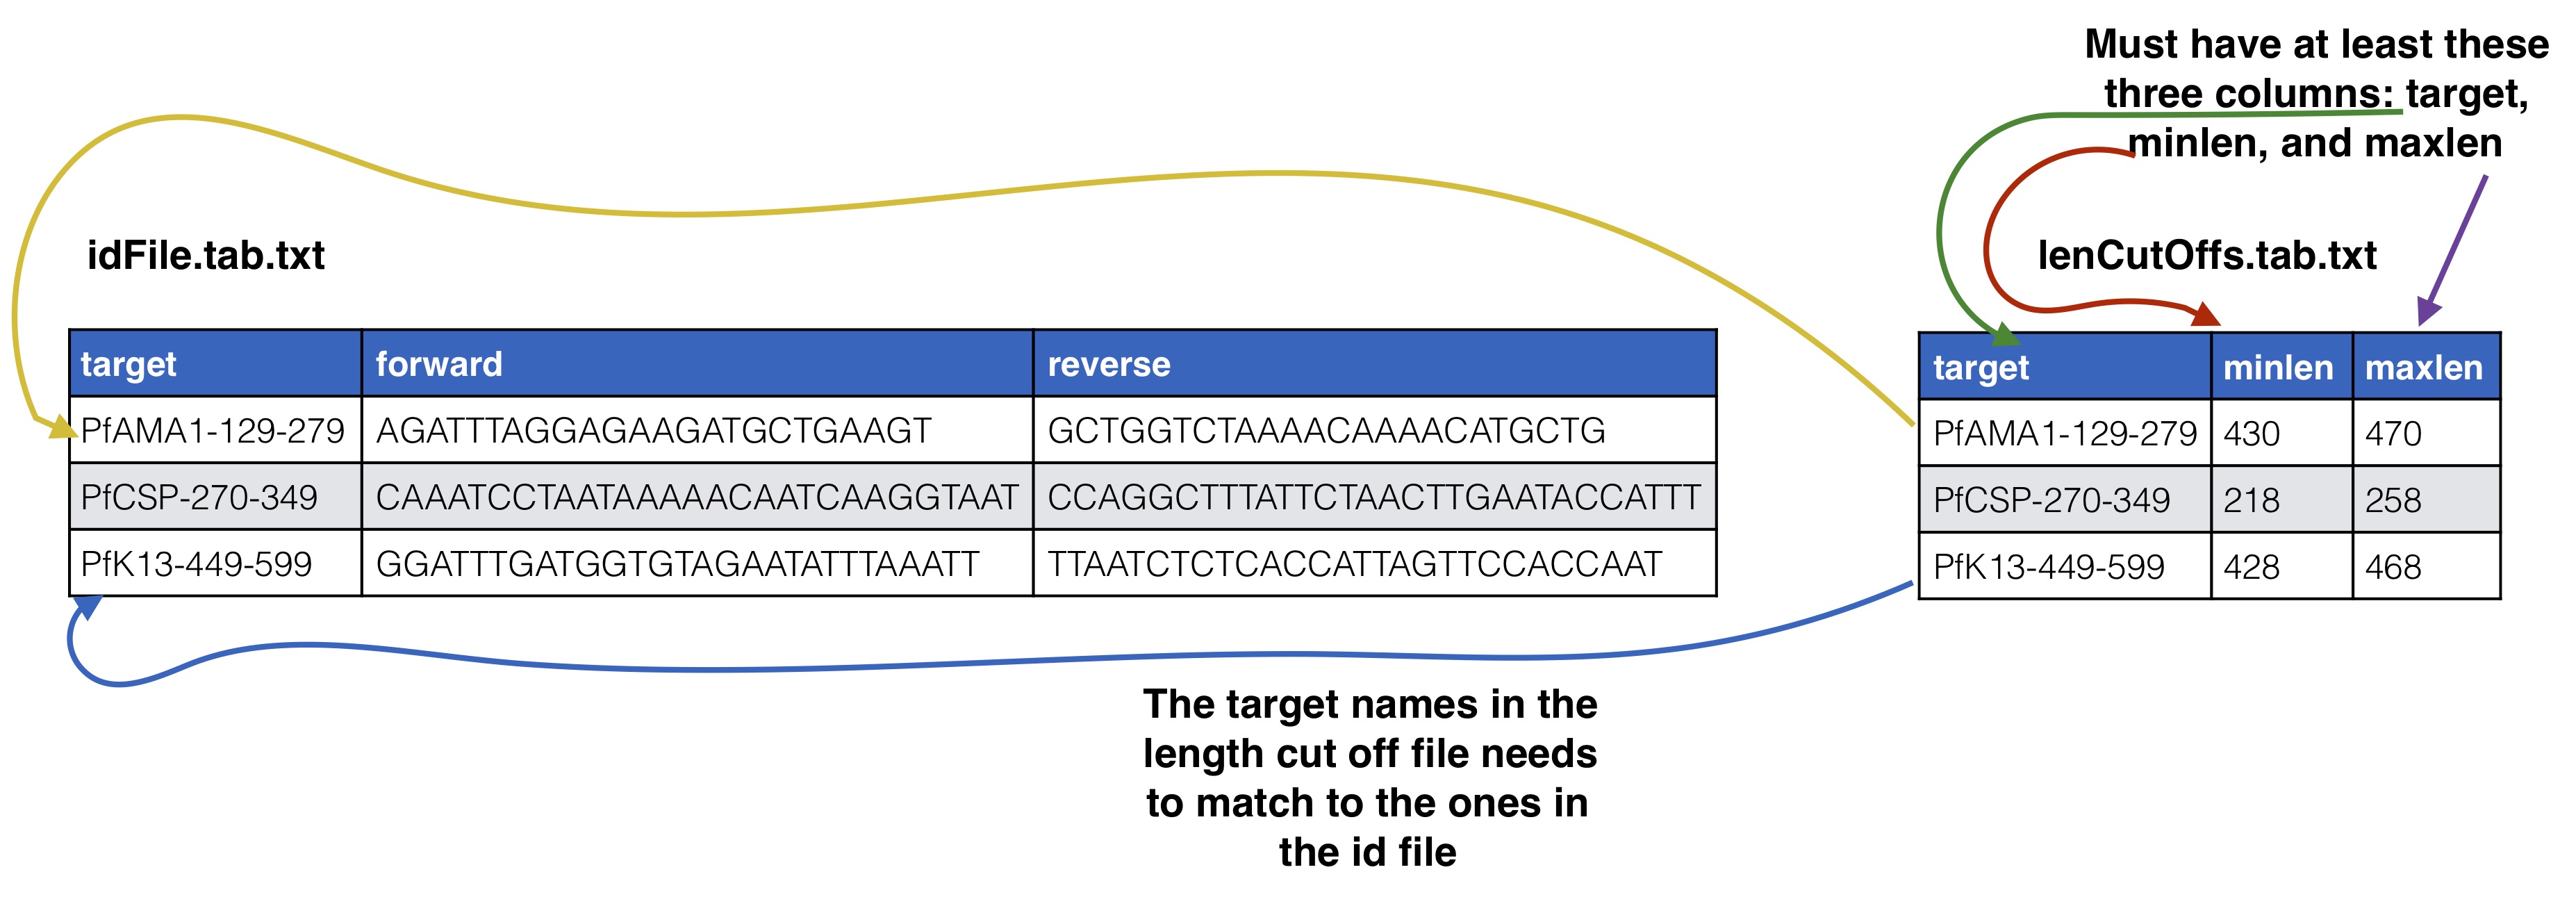# Initial Setup ## Optional[back to top](#TOC)### SeekDeep genTargetInfoFromGenomes SeekDeep comes equipped with a helper function (`SeekDeep genTargetInfoFromGenomes`) to provide some of the files used by the program. It is not required that you use this helper function as all of these files can be created by hand but this helper function can help ease the creation of these files. `SeekDeep genTargetInfoFromGenomes` needs bowtie2 and samtools to be installed and requires a directory of genomes (at least 1). `SeekDeep genTargetInfoFromGenomes` takes a primer ID file that is required by `SeekDeep extractor` and extracts the sequences expected with the primers from the genomes. Below I download just the 3D7 reference genome for *Plasmodium falciparum* but it can be ran on several genomes at once. This simply done by using bowtie2 to find possible locations of the forward and reverse primers (for which degenerative bases are allowed) and then extracts the sequence found in between these hits. ```{bash, eval = F}wget http://seekdeep.brown.edu/data/plasmodiumData/selected_pf3k_genomes.tar.gz tar -zxvf selected_pf3k_genomes.tar.gzwget http://seekdeep.brown.edu/data/SeekDeepTutorialData/ver2_6_0/CamThaiGhanaDRC_2011_2013_drugRes/ids.tab.txtSeekDeep genTargetInfoFromGenomes --gffDir selected_pf3k_genomes/info/gff --genomeDir selected_pf3k_genomes/genomes/ --primers ids.tab.txt --numThreads 7 --pairedEndLength 250 --dout extractedRefSeqs ```## Required options * **\-\-genomeDir** - A directory of genomes that must end in .fasta (the .fasta extension is used to determine which files in this directory to treat as genomes) which will be automatically bowtie2 indexed if they aren't already * **\-\-primers** - The ID file containing the primers used * **\-\-pairedEndLength** - The length of the input sequencing length for paired end analysis (e.g. 250 for 2x250) ## Optional options * **\-\-gffDir** - a directory of gff files to add gene annotation information * **\-\-numThreads** - The number of threads/CPUs to use in parallel * **\-\-dout** - A name of an output directory * **\-\-lenCutOffSizeExpand** - By default the max and min sizes are set to the +/-20 off of the max and min sizes of the extracted seqs, since msp1 here has large length variation, this has been increased to +/- 50 though this could also be solved by using more than just the Pf3D7 genome and using more refs. * **\-\-sizeLimit** - Since by default this program is used for short amplicon analysis there is an default size limit for the extraction length (1000), meaning possible extractions longer than 1000 bp will not be extracted, which can be changed with this flag. ## Output All of the output will be in one directory. Within this directory there will be a directory for each target given in the ID file that contains several useful files including: 1. **extractionCounts.tab.txt** - A file giving how many times each primer hit and the number of extractions per genome 2. **forwardPrimer.fasta** - The forward primer used, if it contained degenerative bases this file will be every possible primer 3. **reversePrimer.fasta** - The reverse primer used, if it contained degenerative bases this file will be every possible primer4. **genomeLocations** - The genomic locations of the extractions 5. **[TARGET_NAME].fasta** - A fasta file of the extractions 5. **[TARGET_NAME]_primersRemoved.fasta** - A fasta file of the extractions with the primers removed There will also be a directory named **forSeekDeep** which will contain three files useful for SeekDeep runs: 1. **lenCutOffs.txt** - A file giving estimated length cut off by using the max and min lengths of the extracted reference sequences 1. **overlapStatuses.txt** - A file indicating the overlap possible given the paired end sequencing length and the length of the reference sequences, required by `SeekDeep extractorPairedEnd`, see [SeekDeep extractor](extractor_usage.html) and [Illumina Paired Info Page](illumina_paired_info.html)1. **refSeqs** - A directory of the extracted reference sequences with a fasta file for each target, this directory can be given to `SeekDeep extractor` to help filter off artifact/contamination # SeekDeep setupTarAmpAnalysis[back to top](#TOC)To setup the analysis use the `SeekDeep setupTarAmpAnalysis` command, see the required and optional commands below. ```{r, engine='bash', eval=F}SeekDeep setupTarAmpAnalysis --samples sampleNames.tab.txt --outDir analysis --inputDir fastq --idFile ../idFile.tab.txt --groupMeta ../groupNames.tab.txt --lenCutOffs ../extractedRefSeqs/forSeekDeep/lenCutOffs.txt --overlapStatusFnp ../extractedRefSeqs/forSeekDeep/overlapStatuses.txt --refSeqsDir ../extractedRefSeqs/forSeekDeep/refSeqs/ ```## Required options * **\-\-samples** - The file with samples names and raw data file names as explained above * **\-\-outDir** - An output directory where analysis will be set up * **\-\-inputDir** - The input raw data directory * **\-\-idFile** - The id file explained above * **\-\-overlapStatusFnp** - The file giving how the mates for each target overlap ## Optional arguments * **\-\-lenCutOffs** - A file with optional max and min lengths for the targets in the dataset * **\-\-groupMeta** - A file with meta data to associate with the input samples, see above to see how this file should be associated with the other input files * **\-\-numThreads** - The number of CPUs to be utilized to speed up analysis * **\-\-refSeqsDir** - A directory of reference sequences to be utilized for filtering out artifacts and possible contamination, needs to have a fasta named with the name of the targets in the ID file ## Passing on additional arguments to the default arguments of the 3 main sub-commands Default scripts are created for each of the downstream analysis commands and additional arguments can be passed onto these scripts via the following three commands. * **\-\-extraExtractorCmds** - Any extra commands to append to the default ones for the extractor step, should be given in quotes e.g. `--extraExtractorCmds="--checkRevComplementForPrimers --qualWindow 50,5,18"`* **\-\-extraQlusterCmds** - Any extra commands to append to the default ones for the qluster step, should be given in quotes * **\-\-extraProcessClusterCmds** - Any extra commands to append to the default ones for the processClusters step, should be given in quotes ## overlapStatusFnp File Set upSee [SeekDeep extractor](extractor_usage.html) and [Illumina Paired Info Page](illumina_paired_info.html) for more information on overlap status input and below is a diagram of how this file should be set up and compared to the input id file. 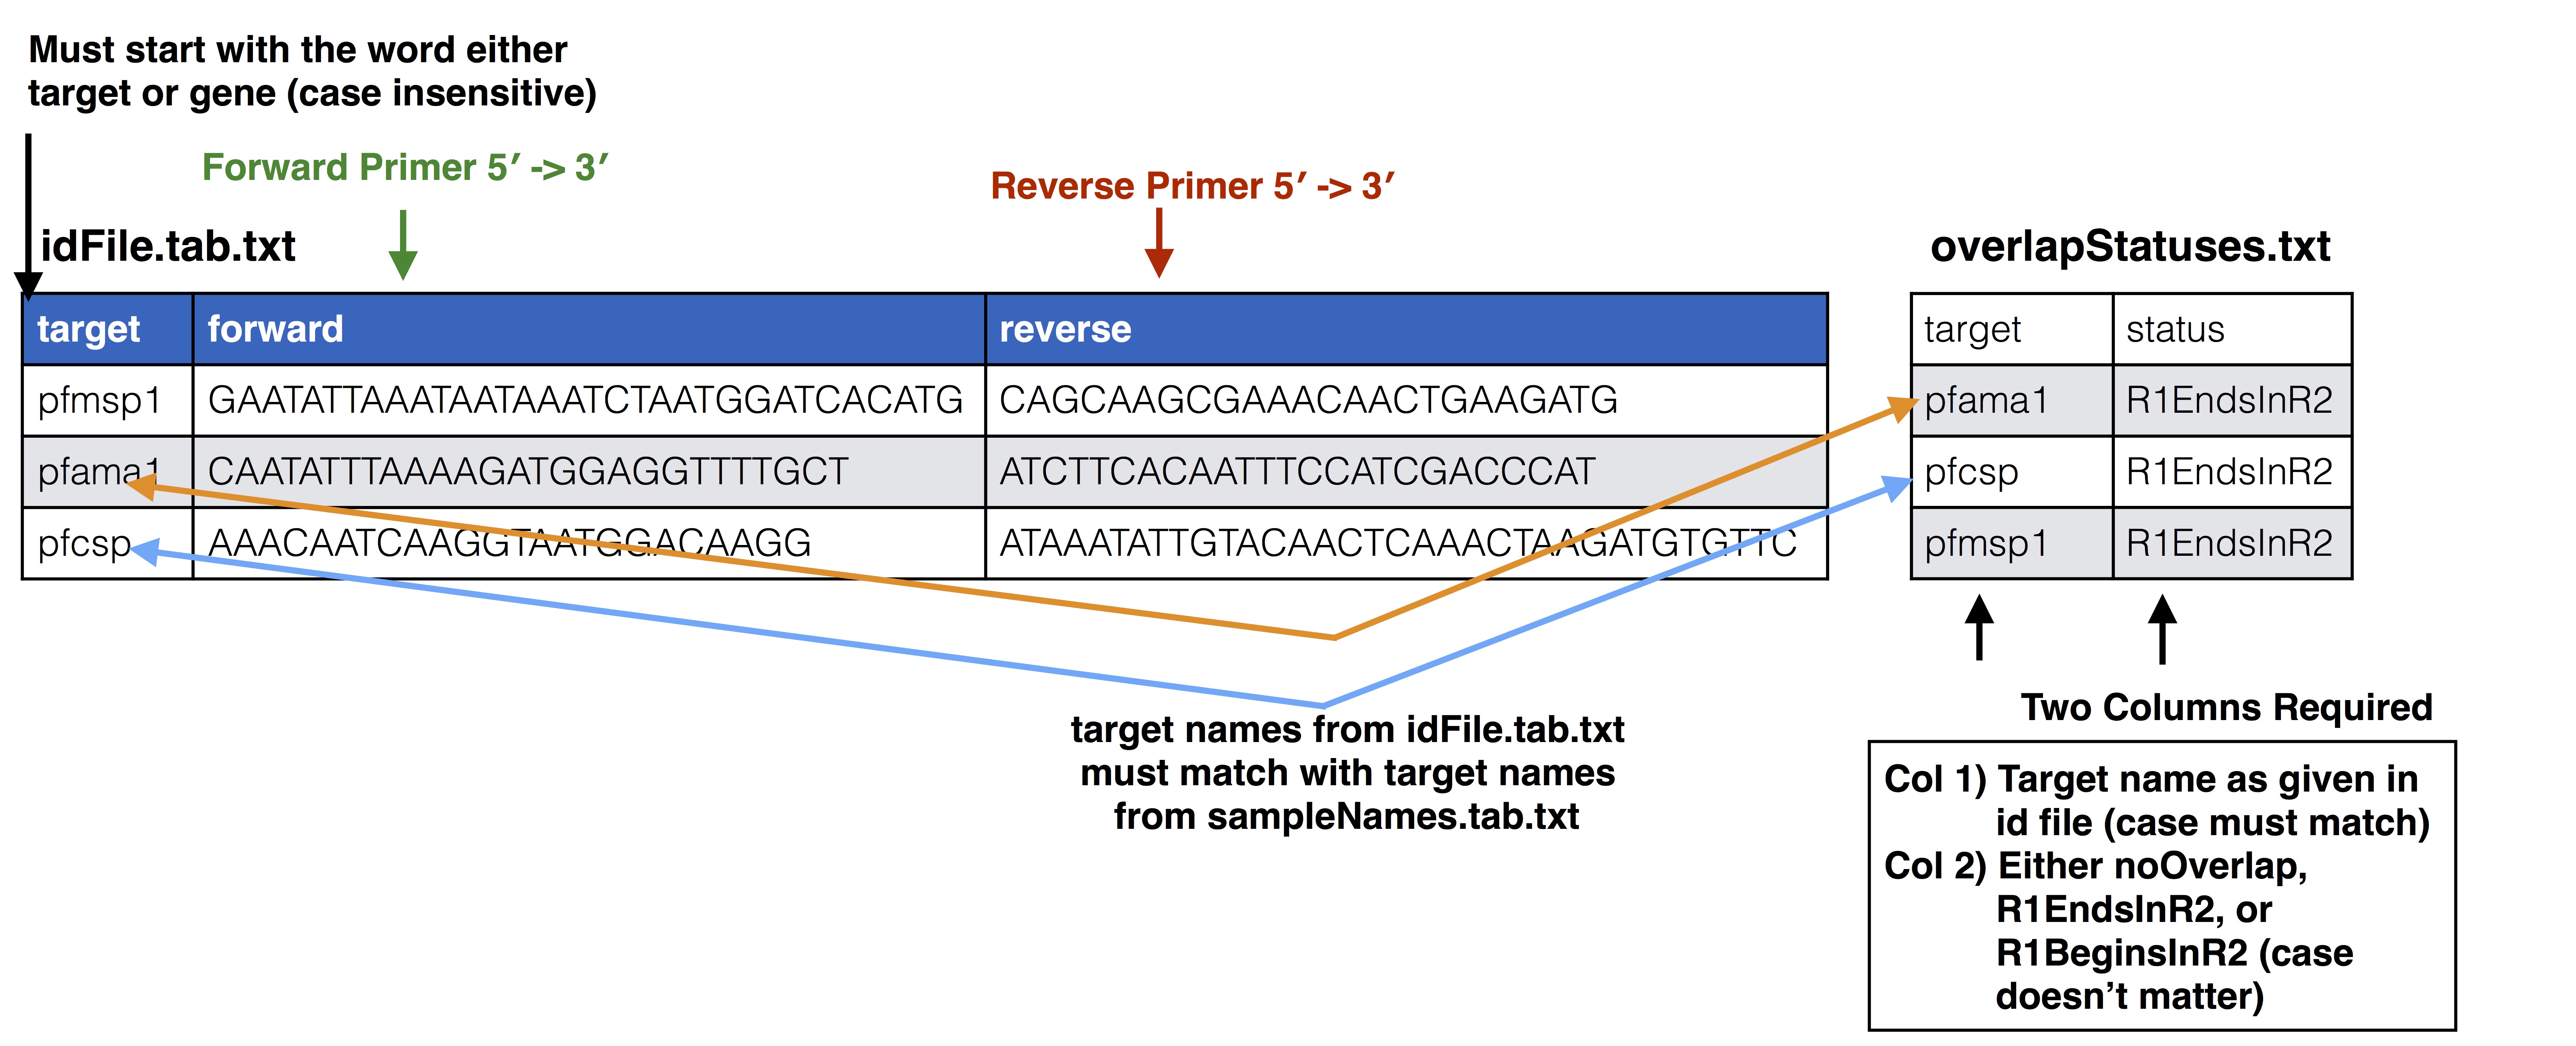This will extract the raw data from the input directory and it will also stitch together the mate reads, a report of how the stitching went will be in the output directory in a directory called reports. Also id files will also be copied into the directory as well. Also default scripts will be created that will run the rest of the analysis with defaults for Illumina data, all of which can be ran by the file, runAnalysis.sh in the output directory. **./runAnalysis.sh** ```{r, engine='bash', eval=F}#!/usr/bin/env bash##run all parts of the pipelinenumThreads=1if [[ $# -eq 1 ]]; then numThreads=$1fiSeekDeep runMultipleCommands --cmdFile extractorCmds.txt --numThreads $numThreads --rawSeekDeep runMultipleCommands --cmdFile qlusterCmds.txt --numThreads $numThreads --rawSeekDeep runMultipleCommands --cmdFile processClusterCmds.txt --numThreads $numThreads --rawSeekDeep runMultipleCommands --cmdFile genConfigCmds.txt --numThreads $numThreads --raw```The files extractorCmds.txt, qlusterCmds.txt, processClusterCmds.txt, and genConfigCmds.txt contain command line commands on each line to run the analysis. The `SeekDeep runMultipleCommands` is command in `SeekDeep` that can take in such a file and run them in parallel speeding up analysis.See below to see how these command files match up to the pipeline. 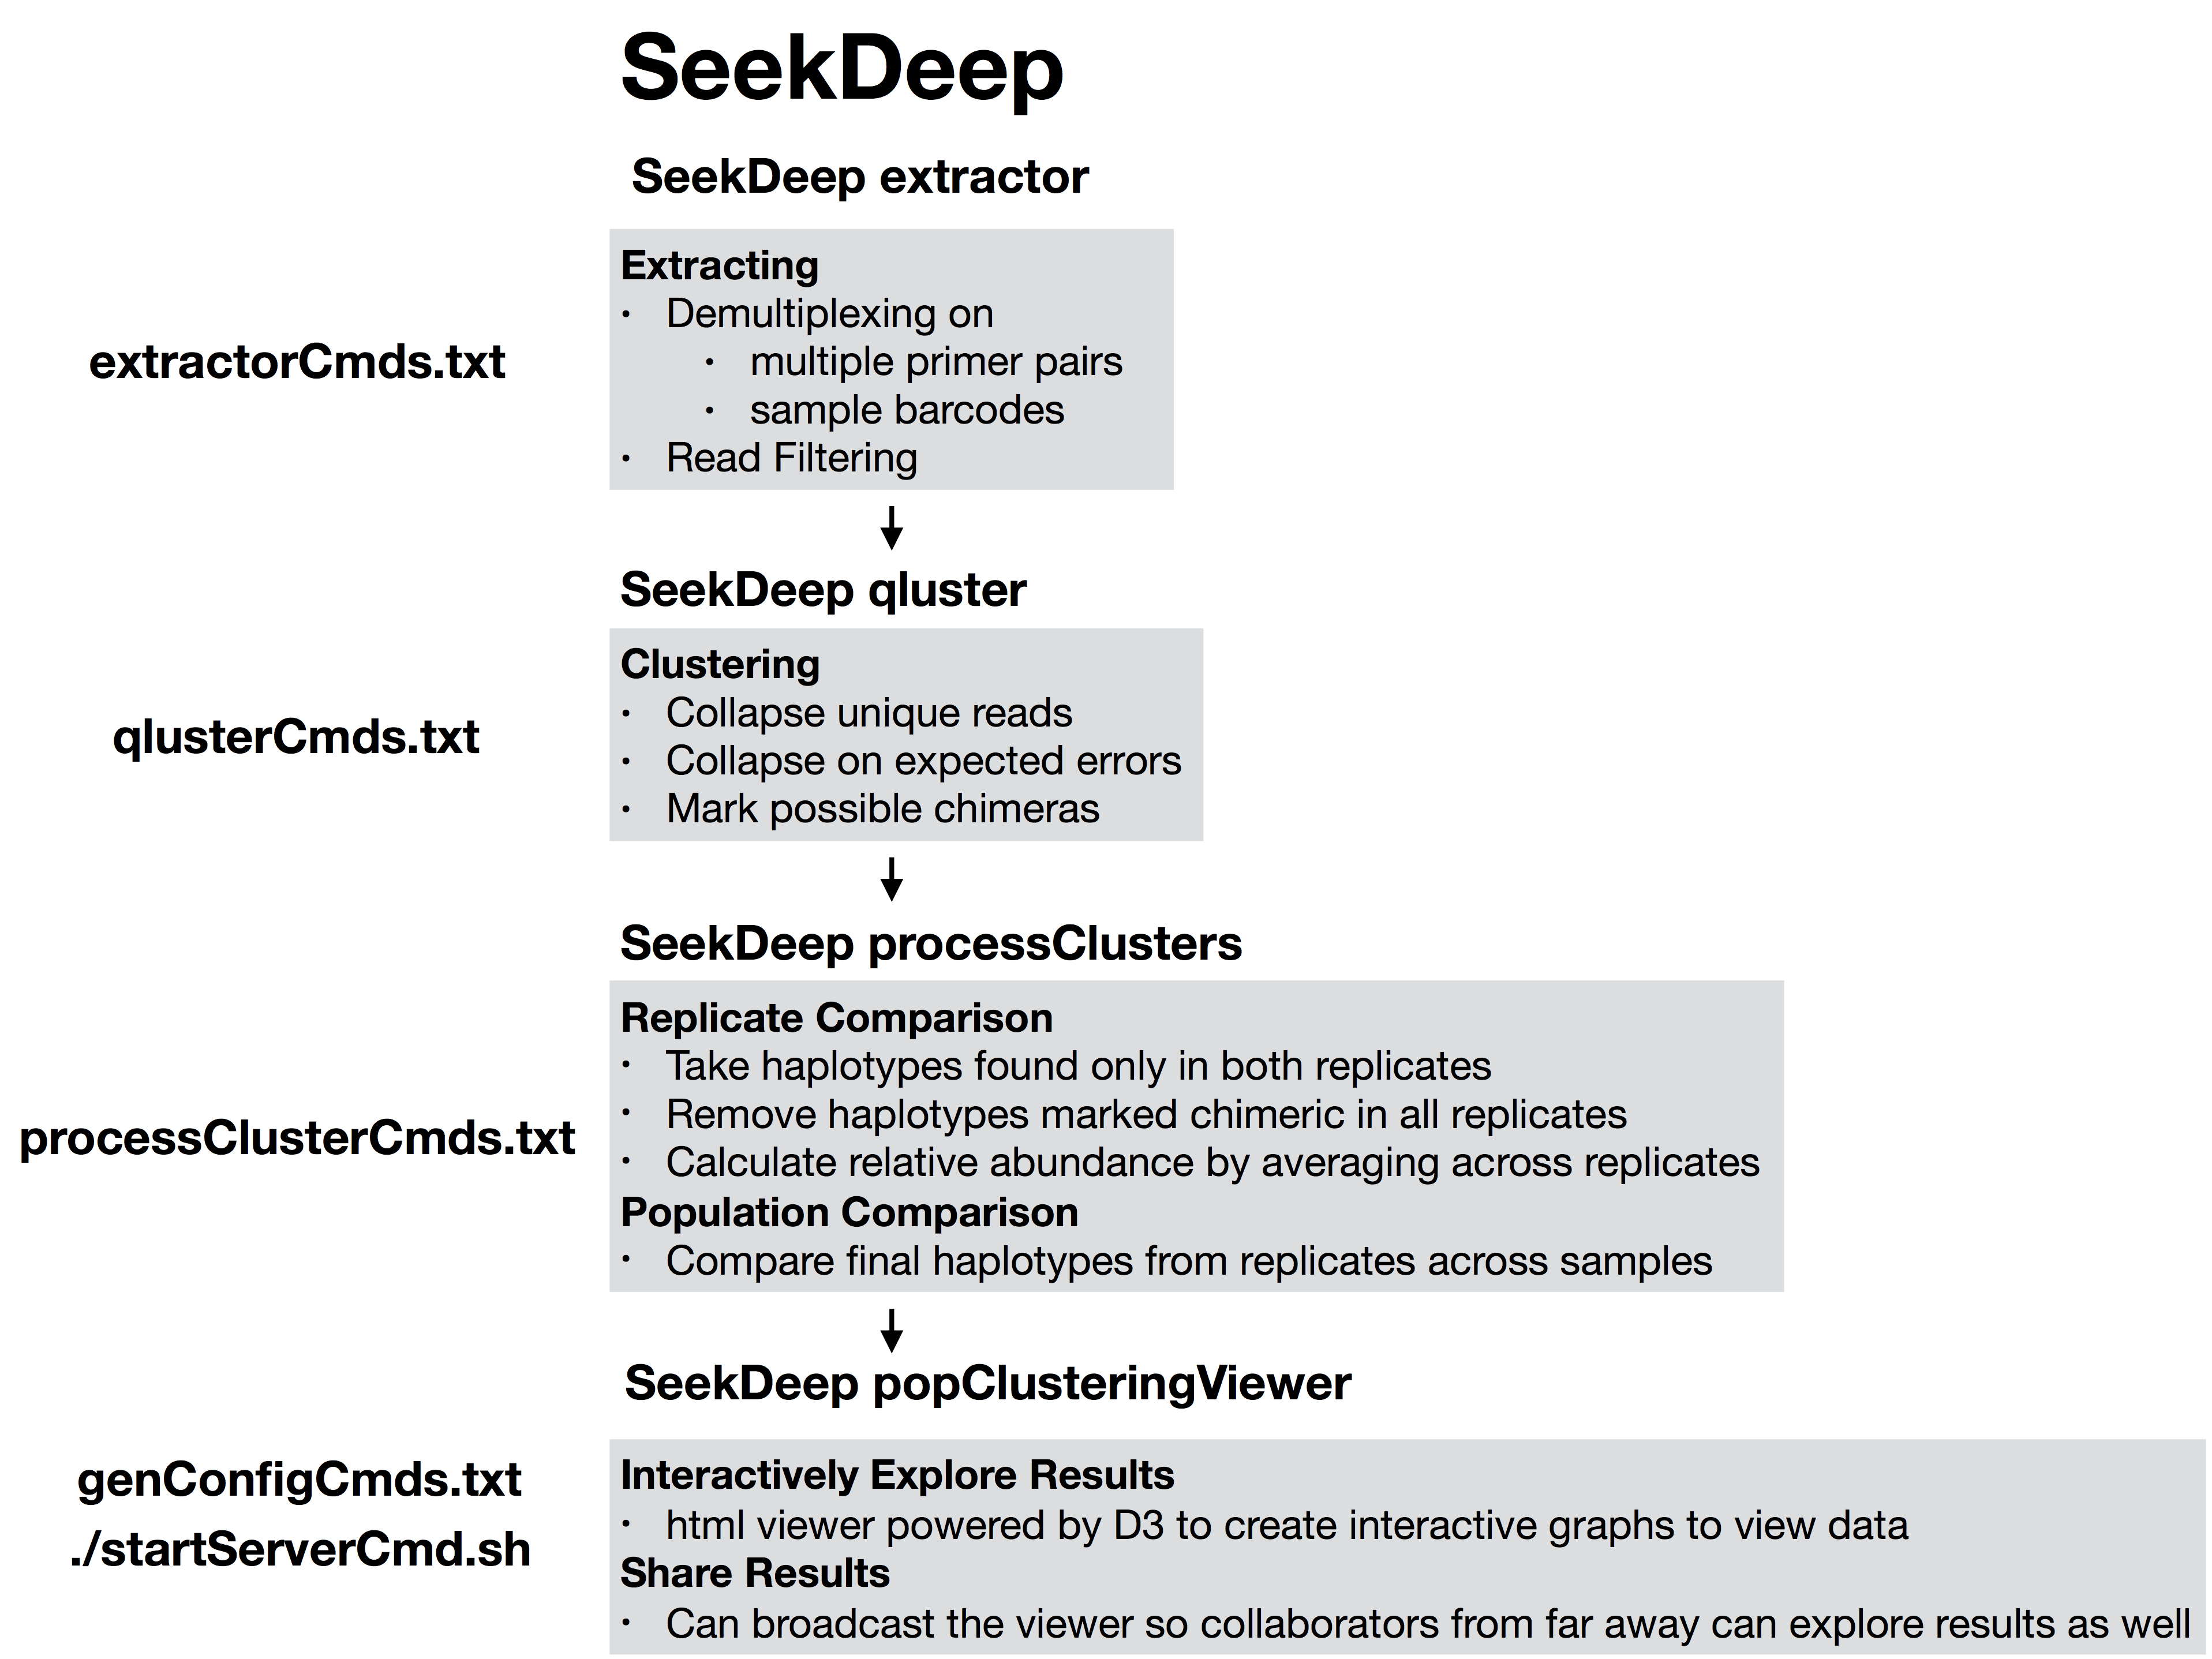And then to start the server to see the data interactively run the file `startServerCmd.sh` after running the above command files. **./startServerCmd.sh** ```{r, engine='bash', eval=F}#!/usr/bin/env bash# Will automatically run the server in the background and with nohup so it will keep runningif [[ $# -ne 2 ]] && [[ $# -ne 0 ]]; then echo "Illegal number of parameters, needs either 0 or 2 argument, if 2 args 1) port number to server on 2) the name to serve on" echo "Examples" echo "./startServerCmd.sh" echo "./startServerCmd.sh 9882 pcv2" exit fiif [[ $# -eq 2 ]]; then nohup SeekDeep popClusteringViewer --verbose --configDir $(pwd)/serverConfigs --port $1 --name $2 &else nohup SeekDeep popClusteringViewer --verbose --configDir $(pwd)/serverConfigs & fi```# Running Tutorial example data The tutorial data was simulated using data from [Pf3k](https://www.malariagen.net/projects/pf3k) to emulate sampling from Ghana, Democratic Republic of the Congo, Thaliand, and Cambodia from 2011 and 2013 with sequencing of 3 different targets regions in AMA1, CSP, and K13 with each patient being sequenced at 3 different time points after recieving treatment. Example datasets are available to demonstrate the several different ways libraries could be set up. Depending on your library prep for Illumina your sequences could be in two different directions or one direction; this depends on if the forward Illumina forward primer/adaptor is always attached to your target primer forward primer or if it could be attached to either primer, see [Illumina Paired End Set up](illumina_paired_info.html) for more details. If your sequences are in both direction you need to add `--checkRevComplementForPrimers` to the extractor commands which can be done in set up by adding it to `--extraExtractorCmds`. Examples datasets have also been created for experiments with no replicates, replicates and a mix of some samples with replicates and some samples without replicates. ## In both directions ```{bash, eval = F}# no replicates## single barcodeswget http://seekdeep.brown.edu/data/SeekDeepTutorialData/ver2_6_0/CamThaiGhanaDRC_2011_2013_drugRes_withRevComp_withBars.tar.gz## dual barcodeswget http://seekdeep.brown.edu/data/SeekDeepTutorialData/ver2_6_0/CamThaiGhanaDRC_2011_2013_drugRes_withRevComp_withDualBars.tar.gz# some samples with replicates, some without## single barcodeswget http://seekdeep.brown.edu/data/SeekDeepTutorialData/ver2_6_0/CamThaiGhanaDRC_2011_2013_drugRes_withRevComp_withBars_withMixReps.tar.gz## dual barcodeswget http://seekdeep.brown.edu/data/SeekDeepTutorialData/ver2_6_0/CamThaiGhanaDRC_2011_2013_drugRes_withRevComp_withDualBars_withMixReps.tar.gz# all samples with replicates## single barcodeswget http://seekdeep.brown.edu/data/SeekDeepTutorialData/ver2_6_0/CamThaiGhanaDRC_2011_2013_drugRes_withRevComp_withBars_withReps.tar.gz## dual barcodeswget http://seekdeep.brown.edu/data/SeekDeepTutorialData/ver2_6_0/CamThaiGhanaDRC_2011_2013_drugRes_withRevComp_withDualBars_withReps.tar.gz```For each of these datasets the setup commands will be the same, only the input sample names file will be different ```{bash, eval = F}wget http://seekdeep.brown.edu/data/SeekDeepTutorialData/ver2_6_0/CamThaiGhanaDRC_2011_2013_drugRes_withRevComp_withBars.tar.gztar -zxvf CamThaiGhanaDRC_2011_2013_drugRes_withRevComp_withBars.tar.gzcd CamThaiGhanaDRC_2011_2013_drugRes_withRevComp_withBars# download genomes if they haven't been beforewget http://seekdeep.brown.edu/data/plasmodiumData/selected_pf3k_genomes.tar.gz tar -zxvf selected_pf3k_genomes.tar.gzSeekDeep genTargetInfoFromGenomes --gffDir selected_pf3k_genomes/info/gff --genomeDir selected_pf3k_genomes/genomes/ --primers ids.tab.txt --numThreads 4 --pairedEndLength 250 --dout extractedRefSeqs# set up command SeekDeep setupTarAmpAnalysis --samples sampleNames.tab.txt --outDir analysis --inputDir fastq/ --idFile ids.tab.txt --overlapStatusFnp extractedRefSeqs/forSeekDeep/overlapStatuses.txt --lenCutOffs extractedRefSeqs/forSeekDeep/lenCutOffs.txt --refSeqsDir extractedRefSeqs/forSeekDeep/refSeqs --extraExtractorCmds="--checkRevComplementForMids --checkShortenBars" --groupMeta metaData.tab.txtcd analysis# run analysis with whatever number of CPUs you want to use (below is 4)./runAnalysis.sh 4# start data viewer./startServerCmd.sh ```Also length cut off and overlap status files can be located in the tutorial directory if you don't want to or can't download the genomes ```{bash, eval = F}SeekDeep setupTarAmpAnalysis --samples sampleNames.tab.txt --outDir analysis --inputDir fastq/ --idFile ids.tab.txt --overlapStatusFnp overlapStatuses.txt --lenCutOffs lenCutOffs.txt --extraExtractorCmds="--checkRevComplementForMids --checkShortenBars" --groupMeta metaData.tab.txt```## All in forward direction ```{bash, eval = F}# no replicates## single barcodeswget http://seekdeep.brown.edu/data/SeekDeepTutorialData/ver2_6_0/CamThaiGhanaDRC_2011_2013_drugRes_withBars.tar.gz## dual barcodeswget http://seekdeep.brown.edu/data/SeekDeepTutorialData/ver2_6_0/CamThaiGhanaDRC_2011_2013_drugRes_withDualBars.tar.gz# some samples with replicates, some without## single barcodeswget http://seekdeep.brown.edu/data/SeekDeepTutorialData/ver2_6_0/CamThaiGhanaDRC_2011_2013_drugRes_withBars_withMixReps.tar.gz## dual barcodeswget http://seekdeep.brown.edu/data/SeekDeepTutorialData/ver2_6_0/CamThaiGhanaDRC_2011_2013_drugRes_withDualBars_withMixReps.tar.gz# all samples with replicates## single barcodeswget http://seekdeep.brown.edu/data/SeekDeepTutorialData/ver2_6_0/CamThaiGhanaDRC_2011_2013_drugRes_withBars_withReps.tar.gz## dual barcodeswget http://seekdeep.brown.edu/data/SeekDeepTutorialData/ver2_6_0/CamThaiGhanaDRC_2011_2013_drugRes_withDualBars_withReps.tar.gz```For each of these datasets the setup commands will be the same, only the input sample names file will be different ```{bash, eval = F}wget http://seekdeep.brown.edu/data/SeekDeepTutorialData/ver2_6_0/CamThaiGhanaDRC_2011_2013_drugRes_withBars.tar.gztar -zxvf CamThaiGhanaDRC_2011_2013_drugRes_withBars.tar.gzcd CamThaiGhanaDRC_2011_2013_drugRes_withBars# download genomes if they haven't been beforewget http://seekdeep.brown.edu/data/plasmodiumData/selected_pf3k_genomes.tar.gz tar -zxvf selected_pf3k_genomes.tar.gzSeekDeep genTargetInfoFromGenomes --gffDir selected_pf3k_genomes/info/gff --genomeDir selected_pf3k_genomes/genomes/ --primers ids.tab.txt --numThreads 4 --pairedEndLength 250 --dout extractedRefSeqs# set up command SeekDeep setupTarAmpAnalysis --samples sampleNames.tab.txt --outDir analysis --inputDir fastq/ --idFile ids.tab.txt --overlapStatusFnp extractedRefSeqs/forSeekDeep/overlapStatuses.txt --lenCutOffs extractedRefSeqs/forSeekDeep/lenCutOffs.txt --refSeqsDir extractedRefSeqs/forSeekDeep/refSeqs --extraExtractorCmds="--checkShortenBars" --groupMeta metaData.tab.txtcd analysis# run analysis with whatever number of CPUs you want to use (below is 4)./runAnalysis.sh 4# start data viewer./startServerCmd.sh ```Also length cut off and overlap status files can be located in the tutorial directory if you don't want to or can't download the genomes ```{bash, eval = F}SeekDeep setupTarAmpAnalysis --samples sampleNames.tab.txt --outDir analysis --inputDir fastq/ --idFile ids.tab.txt --overlapStatusFnp overlapStatuses.txt --lenCutOffs lenCutOffs.txt --groupMeta metaData.tab.txt --extraExtractorCmds="--checkShortenBars"```Check out http://seekdeep.brown.edu/SeekDeepExample to see an example of the server hosting of the replicate tutorial data.